Introduction
For a customer installation I wanted to use a Raspberry Pi to web-enable an existing conventional home alarm system.
The Raspberry Pi should read 4 different digital output signals of the alarm system and display their current status on a web interface.
The system should also run a script when an alarm goes off. The script should collect snapshots from several IP video camera sources and send them via e-mail to the owner of the house.
NOTE: the project is based on the earlier Raspberry Pi Model B with 26 pin GPIO connector. It fits as well on the later Raspberry Pi versions with 40 pin GPIO connectors, but in this case the upper pin numbers will not be used. If in doubt, cross-check the pin functions of your Raspberry Pi model against the circuit diagram below.
Basic Considerations
The signal level of the external home alarm system to connect to is 12 Volts DC. This voltage level can not be fed into the GPIO Ports, which tolerate a maximum level of 3.3 Volts.
So I had to use some kind of voltage level conversion.
This could be done with a resistor based voltage divider, but this this does not provide any galvanic isolation between the Raspberry Pi and the signal source, which is mandatory for the connection to the home alarm system.
So I eventually chose an optocoupler-based solution like the one proposed by and discussed at the raspberrypihobbyist.
It provides both the galvanic isolation of the Raspberry Pi from the alarm system and also a proper signal level for the Raspberry GPIO input pins.
The Optocoupler
The quad optocoupler circuit LTV847 nicely fits here, offering a wide span of posssible input voltages, a good transfer ratio and four individual optocouplers in one case. As an alternative the PC847X can be used.
The PCB
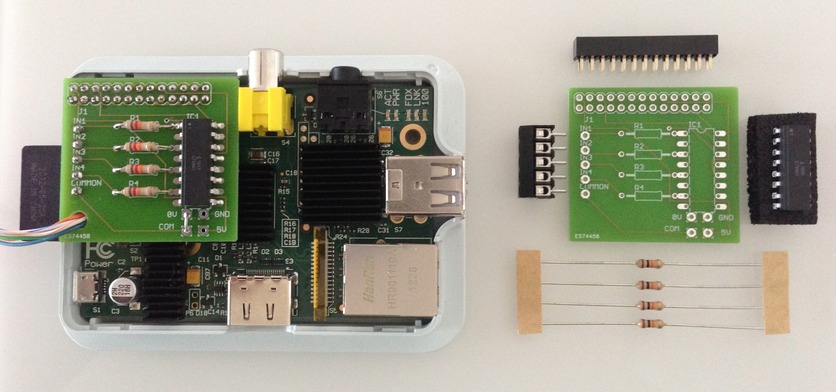
The interface circuit had to fit into a standard Raspberry case, therefore I created a little PCB to keep the module small and to get a high grade of reliability and operational safety.
Solder jumpers on the board allow two different electrical configurations of the input signals.
The PCB and the required components
The Circuit Diagram
The complete module circuit diagram below shows the standard version for galvanic isolated DC signal inputs.
For this version, connect the solder holes '0V' and 'COM' on the PCB (the solder holes 'GND' and '5V' are not used in this configuration).
The pcb provides an alternative input version for potential free contacts. To enable this, connect the solder holes '0V' with 'GND' and 'COM' with '5V' on the PCB.
The circuit diagram of this version is shown below.
Please note that in this version there is of course no galvanic isolation between the Raspberry Pi and the contacts.
Getting It All Together
The terminal block can be mounted on the components side of the PCB or on the soldering side. The latter allows a real compact form factor, which is required to be able to put the Raspberry Pi with the Raspi QDigIn attached into a standard Raspberry Pi case.
Please keep in mind to mount the terminal block inward facing, otherwise the wires will collide with the cover of the case.
The 26-pin GPIO connector is available in different heights. To get a compact version of the interface module, use a low one: 5mm is ideal, 8.5mm might be too high.
Pin Assignments
The input pins are connected to the following GPIO pins:
IN1 --> GPIO 22
IN2 --> GPIO 23
IN3 --> GPIO 24
IN4 --> GPIO 25
These pin numbers are identically for Rev1 and Rev2 Raspberry Pi boards.
Electrical Specifications
Input signal range for 10k resistors: 0…1V low, 4…15V high.
This can be adapted to other requirements by changing the serial resistor values. Please read the optocoupler datasheet and calculate for yourself.
The optocoupler circuit does not have a protection against reverse polarity and over-voltage.
Software
The standard GPIO libraries can be used to read the values of the input pins.
The GPIOs need to be initialized with the internal pull-up resistors activated, e.g.:
GPIO.setup(22, GPIO.IN, pull_up_down=GPIO.PUD_UP)
Sample Python Code
import time;
try:
import RPi.GPIO as GPIO
except RuntimeError:
print("Error importing RPi.GPIO! Try with superuser privileges.")
GPIO.setmode(GPIO.BCM)
GPIO.setwarnings(False)
GPIO.setup(22, GPIO.IN, pull_up_down=GPIO.PUD_UP)
GPIO.setup(23, GPIO.IN, pull_up_down=GPIO.PUD_UP)
GPIO.setup(24, GPIO.IN, pull_up_down=GPIO.PUD_UP)
GPIO.setup(25, GPIO.IN, pull_up_down=GPIO.PUD_UP)
while(True):
print GPIO.input(22), GPIO.input(23), GPIO.input(24), GPIO.input(25)
time.sleep(0.01)
Resulting Values
The resulting values of the GPIO pin readouts are inverted versus the input signals:
0…1V --> GPIO high
4…15V --> GPIO low
Possible Improvements
The interface board could be improved by making the following changes:
- add diode to protect from applying wrong input signal polarity
- add led to indicate input signal presence
The Eagle File
The Eagle file for the circuit board is available on request; please contact me, if you are interested.